How to FTP Using a Program
INTRODUCTION
(NOTE: Specific instructions on how to set up your student server are later in the handout)
The most common method of posting a web page to the web server so it is available to the outside world is using a FTP program. Each student will have space on the Student Server, and will use an FTP program to transfer their pages up to their folders. There are several FTP programs, such as:
There are many other FTP programs; if you have your own FTP program that you prefer, feel free to use it.
A free FTP program called FileZilla would be a good program to start with if you don't already have one. It has versions for Windows, Mac, and Linux. If you have a Mac, Fetch is a good choice. Although normally Fetch is a for-purchase program, if you are using it for educational purposes (which we are), you can get a free Fetch license by filling out this form here: https://fetchsoftworks.com/fetch/free
You can also find a version of FileZilla that will run off of a USB drive. It can be downloaded here:
https://portableapps.com/apps/internet/filezilla_portable.
You may also want to check out other portable applications while you are at portableapps.com
If you have never used an FTP program, FileZilla provides some good tutorials on how to use one. You can find these tutorials here:
Once you installed and opened the FTP program of your choice, you will need to tell the program how to connect to the Student server. Generally this is done by creating a new site, but if you get stuck, feel free to contact me--be sure to let me know which program you are using.
The following instructions will walk you through how to set up FileZilla with an encrypted connection:
- Go to https://filezilla-project.org/ and click on the button "Download FileZilla Client"
**NOTE!!! You don’t want FileZilla Server, you want the Client**
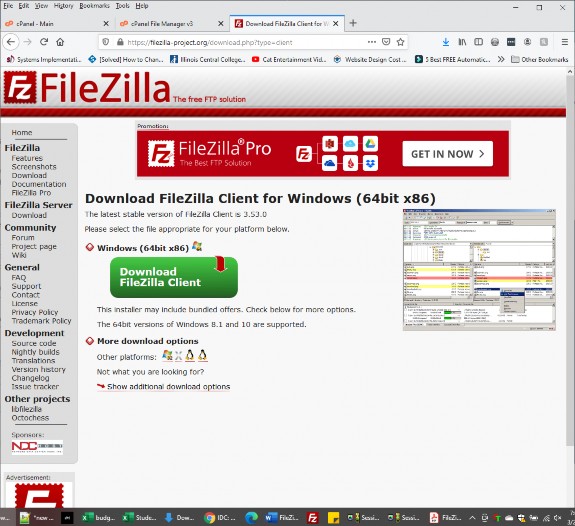
It should show you a screen similar to the one below. DON'T click on the green button; you want to click on "Show additional download options" towards the bottom of the paragraphs.
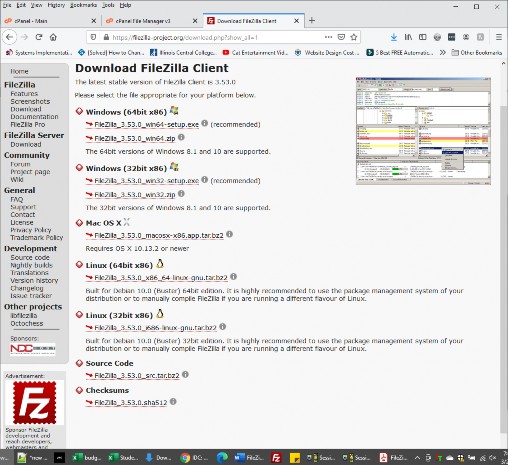
- This will bring you to the download page (see screenshot next page); choose the download for your computer (usually Windows 64 bit).
Click on the link that says "recommended" under the section for your computer
- Once the download starts, it will prompt you to save it. When it is done downloading, find where you put it and double-click on it to run it. When it asks if you want to run the file, click on "Run" and then just follow the prompts to install.
- Once it installs, go ahead and run it. When it first opens, it will have a popup screen that has some information about the program, just click "OK" This should bring you to a screen that looks something like this:
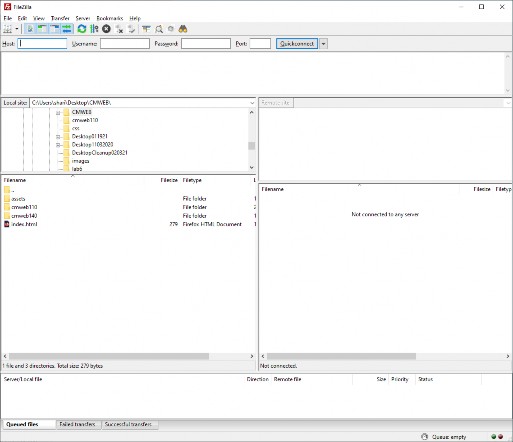
- DO NOT put your information in the boxes across the top of the screen where it says "Host" and "Username" and "Password". If you do it that way, it won't work because you need to put in more settings than the Quickconnect allows. Instead you should create a new site and save it instead. To do that, go to File, then Site Manager.
- This will bring up a Window that looks something like this (although you probably won't have any sites listed yet):
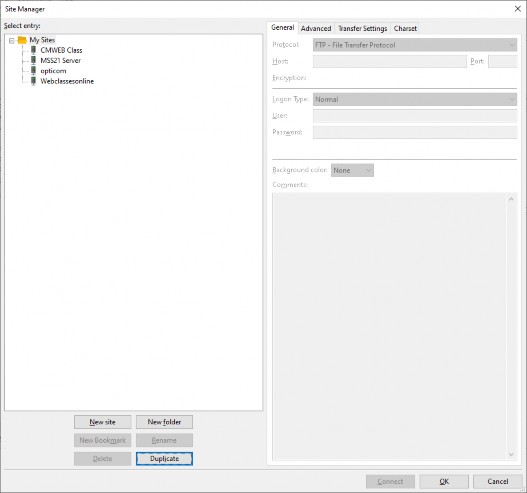
- Click the"New Site" button, and name your site whatever you want; in this case, you could call it "Student Site" or "Class Site" or whatever you would like to call it.
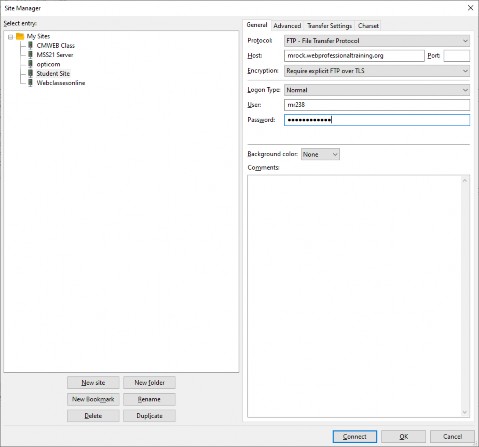
Your settings should follow the following format:
Protocol: FTP-File Transfer Protocol (note, if you have been in previous CMWEB classes, this used to be SFTP, but now it needs to be FTP and we will set the encryption a different way)
Host: YourFirstInitialYourLastName.webprofessionaltraining.org (for example, if my name is John Doe, then my host will be jdoe.webprofessionaltraining.org).
Port: Leave blank
Encryption: Change to "Require explicit FTP over TLS"
Logon Type: Normal
User: Your username will be the same as the one you use for Blackboard; if you are not sure what your ICC username is, you can look it up here: ICC Student Technology
Password: Your password will follow the format of: the first initial of your first name as a capital letter, the first initial of your last name as a lowercase letter, your student ID #, and then a $ and then (in caps) the letters ICC. If that doesn't work, try leaving the ICC at the end off (and leave $ as the last character), as some passwords may still be in the old format if you have had previous classes. So if my name is John Doe and my student id number is 1234567, then my password will be Jd1234567$ICC (or Jd1234567$ under the old format)
If you do not know what your student ID # is, you can find it on your student photo ID, or you can look it up in e-services (see the ICC Student Technology link above). If you can't find it, or just want to double check your credentials, please contact your instructor.
When you are done, your screen should look something like the screenshot on the next page (I just used a fictional student site and username to show how it might look; you would of course want to put your own values.):
- Once you have everything entered, click "OK". This will save it. Now go back into File, then Site Manager, click on your site, and click Connect.
- If it pops up a box with a message saying that the "host key is unknown" this is because the site is using a self-generated encryption key rather than obtaining one from an outside source. Just check the box that says, "always trust this site, add this key to the cache" and then click OK
- If everything connects ok, you should see a listing of folders and files appear in the right-hand window. This is a listing of the folders and files on the web server. Remember, the Right
window is the Remote window. The directory you are looking at when you first connect is the root directory. Only you or someone who has your username and password can see this directory. For files that you want to be visible on the internet, you need to double-click on the public_html directory so you are inside of it.
- Once you are in the public_html directory, you can drag and drop files and folders into the directory either from the left-hand window (Left is Local) OR by opening up a folder on your computer and just dragging files and folders directly from it. **NOTE: if you are connected but it is not letting you drag and drop, try exiting Filezilla, then restarting the computer, and then getting back into Filezilla and connecting to your site, then try it again.
- Once you drag a file over and drop it and it is transferred, you should be able to see it if you go
to your Student Page in a browser. You can do that by opening up a browser and typing your Student Page address directly (the same address you put in the "Host" field in Filezilla) and hitting enter (in my example above, it was mrock.webprofessionaltraining.org).
IMPORTANT!!! Your site won't display anything until it has your index.html file (all lowercase) directly inside the public_html folder. It CANNOT be inside a sub-folder inside public_html, it must be directly inside the public_html folder.


